
Candlestick Pattern
Bearish
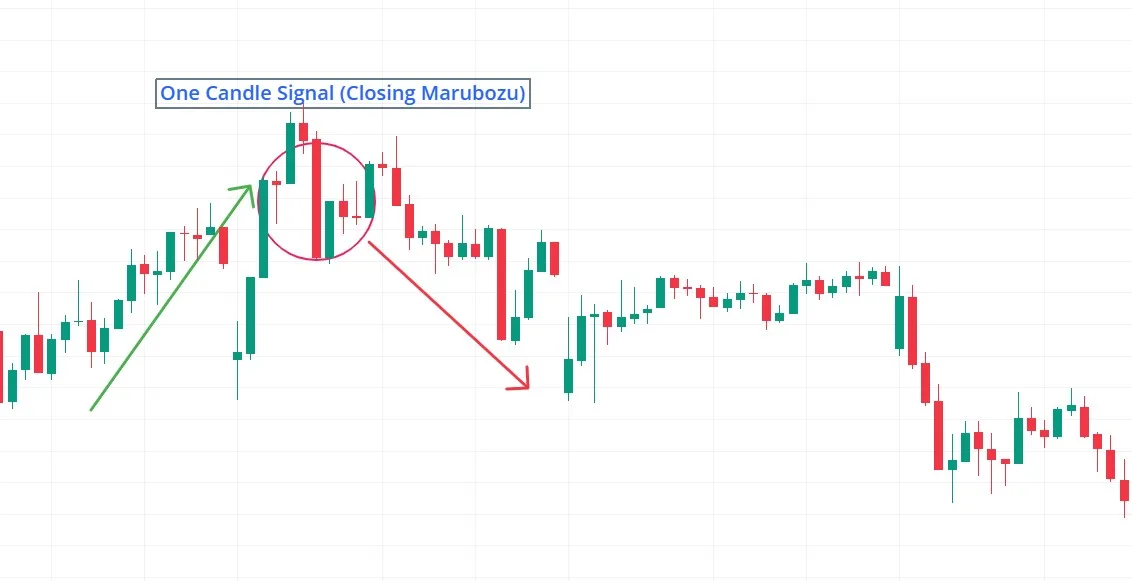
One Candle Signal वन कैंडल सिग्नल
Bullish Closing Marubozu → Strong bullish continuation / reversal signal. बुलिश क्लोजिंग मारुबोजू → मजबूत तेजी संकेत (निरंतरता/उलटफेर)।
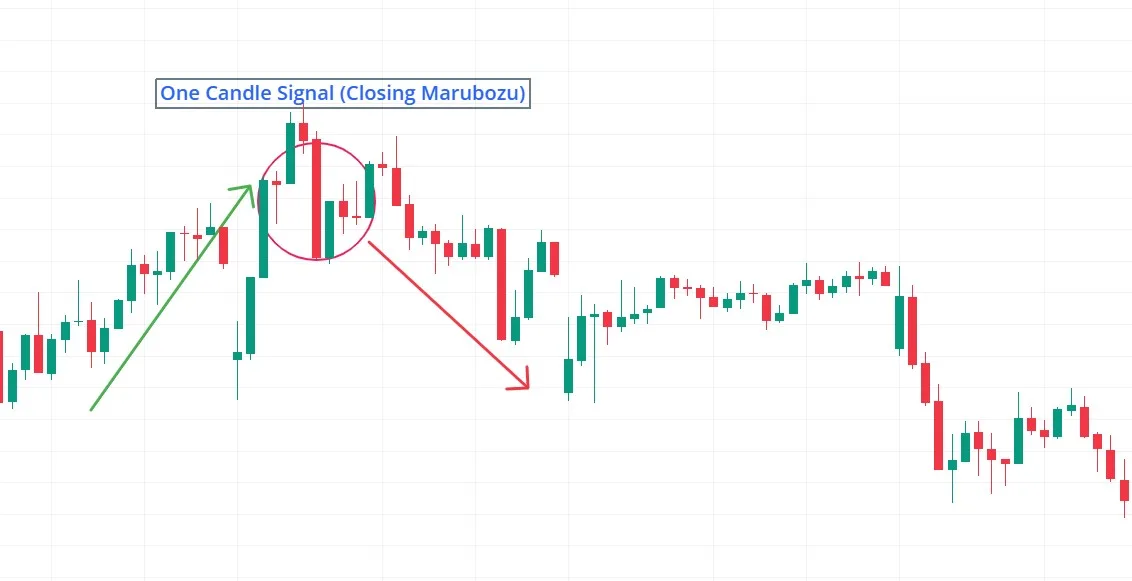
Pattern Overview
Type
- Bullish Closing Marubozu → Strong bullish continuation / reversal signal.
- Bearish Closing Marubozu → Strong bearish continuation / reversal signal.
Reliability
- High reliability in trending markets; less reliable in choppy or range-bound conditions.
Formation & Structure
Formation
- Number of Candles: 1 candle.
- Visual Traits:
- Bullish → Long green body with no upper wick (closes at high).
- Bearish → Long red body with no lower wick (closes at low).
- Strict Identification Criteria:
- Body significantly larger than recent candles.
- No visible wick on the closing side (bullish: no upper wick; bearish: no lower wick).
- Ideally appears with above-average volume.
Psychological Interpretation
- Bullish Marubozu:
- Buyers maintain complete control throughout the session.
- No price rejection at highs → unwavering demand.
- Bearish Marubozu:
- Sellers dominate from open to close.
- No lower wick shows absence of buying pressure.
Real-World Example
- Asset: XYZ stock in established uptrend.
- Setup:
- Bullish Closing Marubozu forms after minor pullback.
- Confirmations:
- Volume 30 % above 20-day average.
- RSI (14) between 40-60 (not overbought).
- Subsequent Action: Price resumes uptrend with ~5 % gain over next 3 sessions.
Strategic Insights
Entry & Confirmation
- Entry methods:
- Aggressive → Enter at next candle’s open.
- Conservative → Enter on close above Marubozu high.
- Confirmation tools:
- Volume spike (≥ 20 % above average).
- MACD histogram turns positive.
- Price above key moving averages (e.g., 50 EMA).
Trigger Points & Exit Targets
- Trigger:
- Bullish → Break above Marubozu high.
- Bearish → Break below Marubozu low.
- Exit strategies:
- Minimum 1 : 1.5 risk-reward ratio.
- Previous swing high/low as targets.
- Trailing stop after 2 R profit.
Risk Management
- Stop-loss:
- Bullish → Below Marubozu midpoint.
- Bearish → Above Marubozu midpoint.
- Position size: 1-2 % account risk per trade.
Pro Tip
- “The strongest Marubozu signals occur when they break key consolidation ranges.”
Common Pitfalls & Cautions
Frequent Mistakes
- Trading Marubozu in sideways markets (low reliability).
- Ignoring wick formation on subsequent candles.
Expert Advice
- “False breakouts are common when volume doesn’t confirm.”
Variations & Similar Patterns
Similar Patterns
- Opening Marubozu (no wick on open side).
- Kicking pattern (requires price gap).
Unique Aspect
- Closing Marubozu specifically captures the session’s final sentiment.
Quiz: Trader Knowledge Check
True or False
- A Closing Marubozu remains valid even with small upper/lower wicks.
- (Answer: False – a true Marubozu requires no wick on the closing side.)
पैटर्न की जानकारी
प्रकार
- बुलिश क्लोजिंग मारुबोजू → मजबूत तेजी संकेत (निरंतरता/उलटफेर)।
- बेयरिश क्लोजिंग मारुबोजू → मजबूत मंदी संकेत (निरंतरता/उलटफेर)।
विश्वसनीयता
- ट्रेंडिंग मार्केट में उच्च विश्वसनीयता; रेंज-बाउंड मार्केट में कम।
संरचना और विशेषताएं
संरचना
- कैंडल संख्या: 1 कैंडल।
- दिखावट:
- बुलिश → लंबा हरा बॉडी, ऊपरी विक नहीं (हाई पर क्लोज)।
- बेयरिश → लंबा लाल बॉडी, निचली विक नहीं (लो पर क्लोज)।
- सख्त पहचान शर्तें:
- पिछली कैंडल्स की तुलना में बड़ा बॉडी।
- क्लोजिंग साइड पर विक नहीं (बुलिश: ऊपरी विक नहीं; बेयरिश: निचली विक नहीं)।
- आदर्श रूप से औसत से अधिक वॉल्यूम के साथ।
मनोवैज्ञानिक विश्लेषण
- बुलिश मारुबोजू:
- खरीदार पूरे सेशन पर नियंत्रण रखते हैं।
- हाई पर कोई रिजेक्शन नहीं → मजबूत मांग दर्शाता है।
- बेयरिश मारुबोजू:
- बिकवाली का पूरा दबाव, ओपन से क्लोज तक।
- निचली विक का अभाव → कोई खरीदारी दबाव नहीं।
वास्तविक उदाहरण
- एसेट: XYZ शेयर अपट्रेंड में।
- सेटअप:
- मामूली पुलबैक के बाद बुलिश क्लोजिंग मारुबोजू बनता है।
- पुष्टि संकेत:
- 20-दिन के औसत से 30 % अधिक वॉल्यूम।
- RSI (14) 40-60 के बीच (ओवरबॉट नहीं)।
- परिणाम: अगले 3 सेशन में क़ीमत ~5 % बढ़ी।
ट्रेडिंग रणनीति
एंट्री और पुष्टि
- एंट्री विधियाँ:
- आक्रामक → अगली कैंडल के ओपन पर एंट्री।
- रूढ़िवादी → मारुबोजू हाई के ऊपर क्लोज का इंतज़ार।
- पुष्टि उपकरण:
- वॉल्यूम स्पाइक (औसत से ≥ 20 % अधिक)।
- MACD हिस्टोग्राम पॉज़िटिव।
- प्राइस प्रमुख मूविंग एवरेज (जैसे 50 EMA) के ऊपर।
ट्रिगर और टारगेट
- ट्रिगर पॉइंट:
- बुलिश → मारुबोजू हाई के ऊपर ब्रेक।
- बेयरिश → मारुबोजू लो के नीचे ब्रेक।
- एग्ज़िट रणनीतियाँ:
- कम से कम 1 : 1.5 रिस्क-रिवार्ड अनुपात।
- पिछला स्विंग हाई/लो टारगेट।
- 2 R प्रॉफिट के बाद ट्रेलिंग स्टॉप।
रिस्क प्रबंधन
- स्टॉप-लॉस:
- बुलिश → मारुबोजू मिडपॉइंट के नीचे।
- बेयरिश → मारुबोजू मिडपॉइंट के ऊपर।
- पोज़िशन साइज: प्रति ट्रेड अकाउंट का 1-2 %।
प्रो टिप
- “सबसे मजबूत मारुबोजू संकेत तब मिलते हैं जब वे महत्वपूर्ण कंसोलिडेशन रेंज को तोड़ते हैं।”
सामान्य गलतियाँ और सावधानियाँ
आम भूलें
- रेंज-बाउंड मार्केट में मारुबोजू ट्रेड करना (कम विश्वसनीय)।
- अगली कैंडल्स पर विक बनने को नज़रअंदाज़ करना।
विशेषज्ञ चेतावनी
- “वॉल्यूम पुष्टि न होने पर फेल ब्रेकआउट आम हैं।”
समान पैटर्न्स
समान पैटर्न
- ओपनिंग मारुबोजू (ओपन साइड पर विक नहीं)।
- किकिंग पैटर्न (गैप आवश्यक)।
विशेष पहलू
- क्लोजिंग मारुबोजू विशेष रूप से सेशन के अंतिम भाव को दर्शाता है।
क्विज: व्यापारी ज्ञान परीक्षण
True or False
- सही या गलत: क्लोजिंग मारुबोजू छोटे ऊपरी/निचले विक के साथ भी वैध होता है।
- (उत्तर: गलत – असली मारुबोजू में क्लोजिंग साइड पर विक नहीं होना चाहिए।)